Recipes
Egg and Banana Pancakes

Pancake day is one of my favourite food calendar highlights. Spelt flour or buckwheat flour pancakes are on the top of my list. For your savoury pancakes nothing can beat a good galette bretonne with some melted butter in the mixture. As for fillings spinach, ricotta and sundried tomato and good quality cheddar and ham are two I always choose. And for my sweet tooth I can’t find two more satisfying than a chocolate spread and banana filling or a simple drizzle of maple syrup with cinnamon and crushed walnuts.
But today I am suggesting you try a different kind of pancake, without flour and one that can use those over ripened, even black bananas which you squashed forgotten at the bottom of your fruit bowl.
Egg and banana pancakes, as sung by Jack Johnson the troubadour of the surf, are a fantastic breakfast but can make a great gluten free alternative for pancake day. And all of our Love Food Hate Waste cooking workshop participants, who learned how to make those on 7 February, will tell you they are simple and quick to make. So don’t hesitate to give them a go.
Ingredients:
- 1 mashed overripe banana(large)
- 2 eggs
- ½ tablespoon baking powder
- ½ teaspoon cinnamon
- 1-2 Tablespoon flax/lineseed ground (optional)
Or - 2 Tablespoons peanut or almond butter (optional)
- Pinch of salt
- Olive oil/butter/or coconut oil.
Preparation:
- Mash the banana well.
- Mix with the beaten eggs.
- Sprinkle the baking powder, cinnamon and salt and mix well.
- If you are adding ground seeds and peanut butter do this last and mix well.
- Alternative just throw everything in a mixer/blender and mix well.
- Add 1-2 tablespoons of the mixture to a slightly oiled pan.
- Cook on very low heat for up to a minute or until the edges seem set and the middle seems almost set.
- Flip with a spatula and cook for another 30 seconds max.
- Serve with crispy bacon and maple syrup, or fruit, yoghurt and honey.
Tips: You can add chopped or mashed fruit in the pancakes. The ground seeds or the peanut butter can help bind the mixture. Don’t worry if the mixture seems too runny. Just cook the pancake at a lower temperature until the edges of the pancake seem set and the middle almost set. You can prepare the mixture the night before and leave in your fridge ready for breakfast.
The savvy soup called Ribollita


")
Have you ever looked at vegetable leftovers in your fridge or the seasonal mix in your vegetable boxes and thought: ‘What could I make with this?’. Have you every thrown away cooked vegetable leftovers? If yes this soup is for you. If not the soup is still for you so try it anyway.
In the past month I have been working with Green City Events to deliver the Love Food Hate Waste Cities Campaign in Cardiff through Roath based roadshows and cooking workshops. In this process I have been developing and revisiting recipes that can help people be savvy and healthy.
The lovely soups of Ribollita and Minestrone were my natural first choices because they are very easy to make and they can have as many variations as the people who make them.
Ribollita literally means reboiled in Italian. It is a Tuscan soup that uses leftover cooked vegetable and is eaten with stale toasted or grilled bread. You can make Ribollita with any seasonal vegetable at our disposal but the dominant ingredient should be a mix of greens and you should include some kind of cooked bean.
My Ribollita soup can be easily turned to a Minestrone with the addition of more stock or water and pasta or quinoa. This is a great solution if you have less vegetable or more visitors to feed.
On 7 February 2015 at our first Love Food Hate Waste cooking workshop participants prepared four different versions of Ribollita and Minestrone types of soup using different herbs to flavour it, different grains or pasta and mix of vegetables at their disposal. Why not love food and your leftover vegetable too by trying our soup?
Ingredients:
- 1 onion, chopped
- 1 celery stick
300 mixed greens - 150-200 g left over root vegetable/squash or potato
- 2 carrots (around 160g)
- 4 Garlic cloves
- ½-1 tin chopped tomatoes Or a couple of ripe tomatoes chopped
- 1 can beans drained and washed
- (280g) 50g rice/quinoa Or 100g pasta 2lt stock or boiling water
- Herbs of your choice such as: 10-15 leaves of basil 1 teaspoon oregano Or 2 teaspoons thyme 3 bay leaves Salt & Pepper
- Pecorino or parmesan cheese garnish (optional)
Preparation:
- Wash and chop all your vegetable and greens.
- Sauté the onion with a pinch of salt until translucent.
- Add the garlic and herbs and sauté for a few minutes.
- Add the chopped tomatoes and sauté for another few minutes.
- Add the root vegetable or potatoes and carrot and stir fry for a bit.
- Add the stock and simmer for ten minutes.
- Add the beans, greens and pasta and simmer for another 10 minutes.
- If you are using quinoa and rice add at the same time as the stock.
- Seasons with salt and pepper.
Lia’s Tips: the authentic ribollita uses recooked vegetable which you can add towards the end of the soup. Sage and parsley are another great combination of herbs for this soup. Kale, Cavolo Nero, flower sprouts, brussels sprouts, broccoli stalks and spring greens are some of the delicious leafs that you can add to your soup.
Eggs in red sauce-Shakshuka and Strapatsada
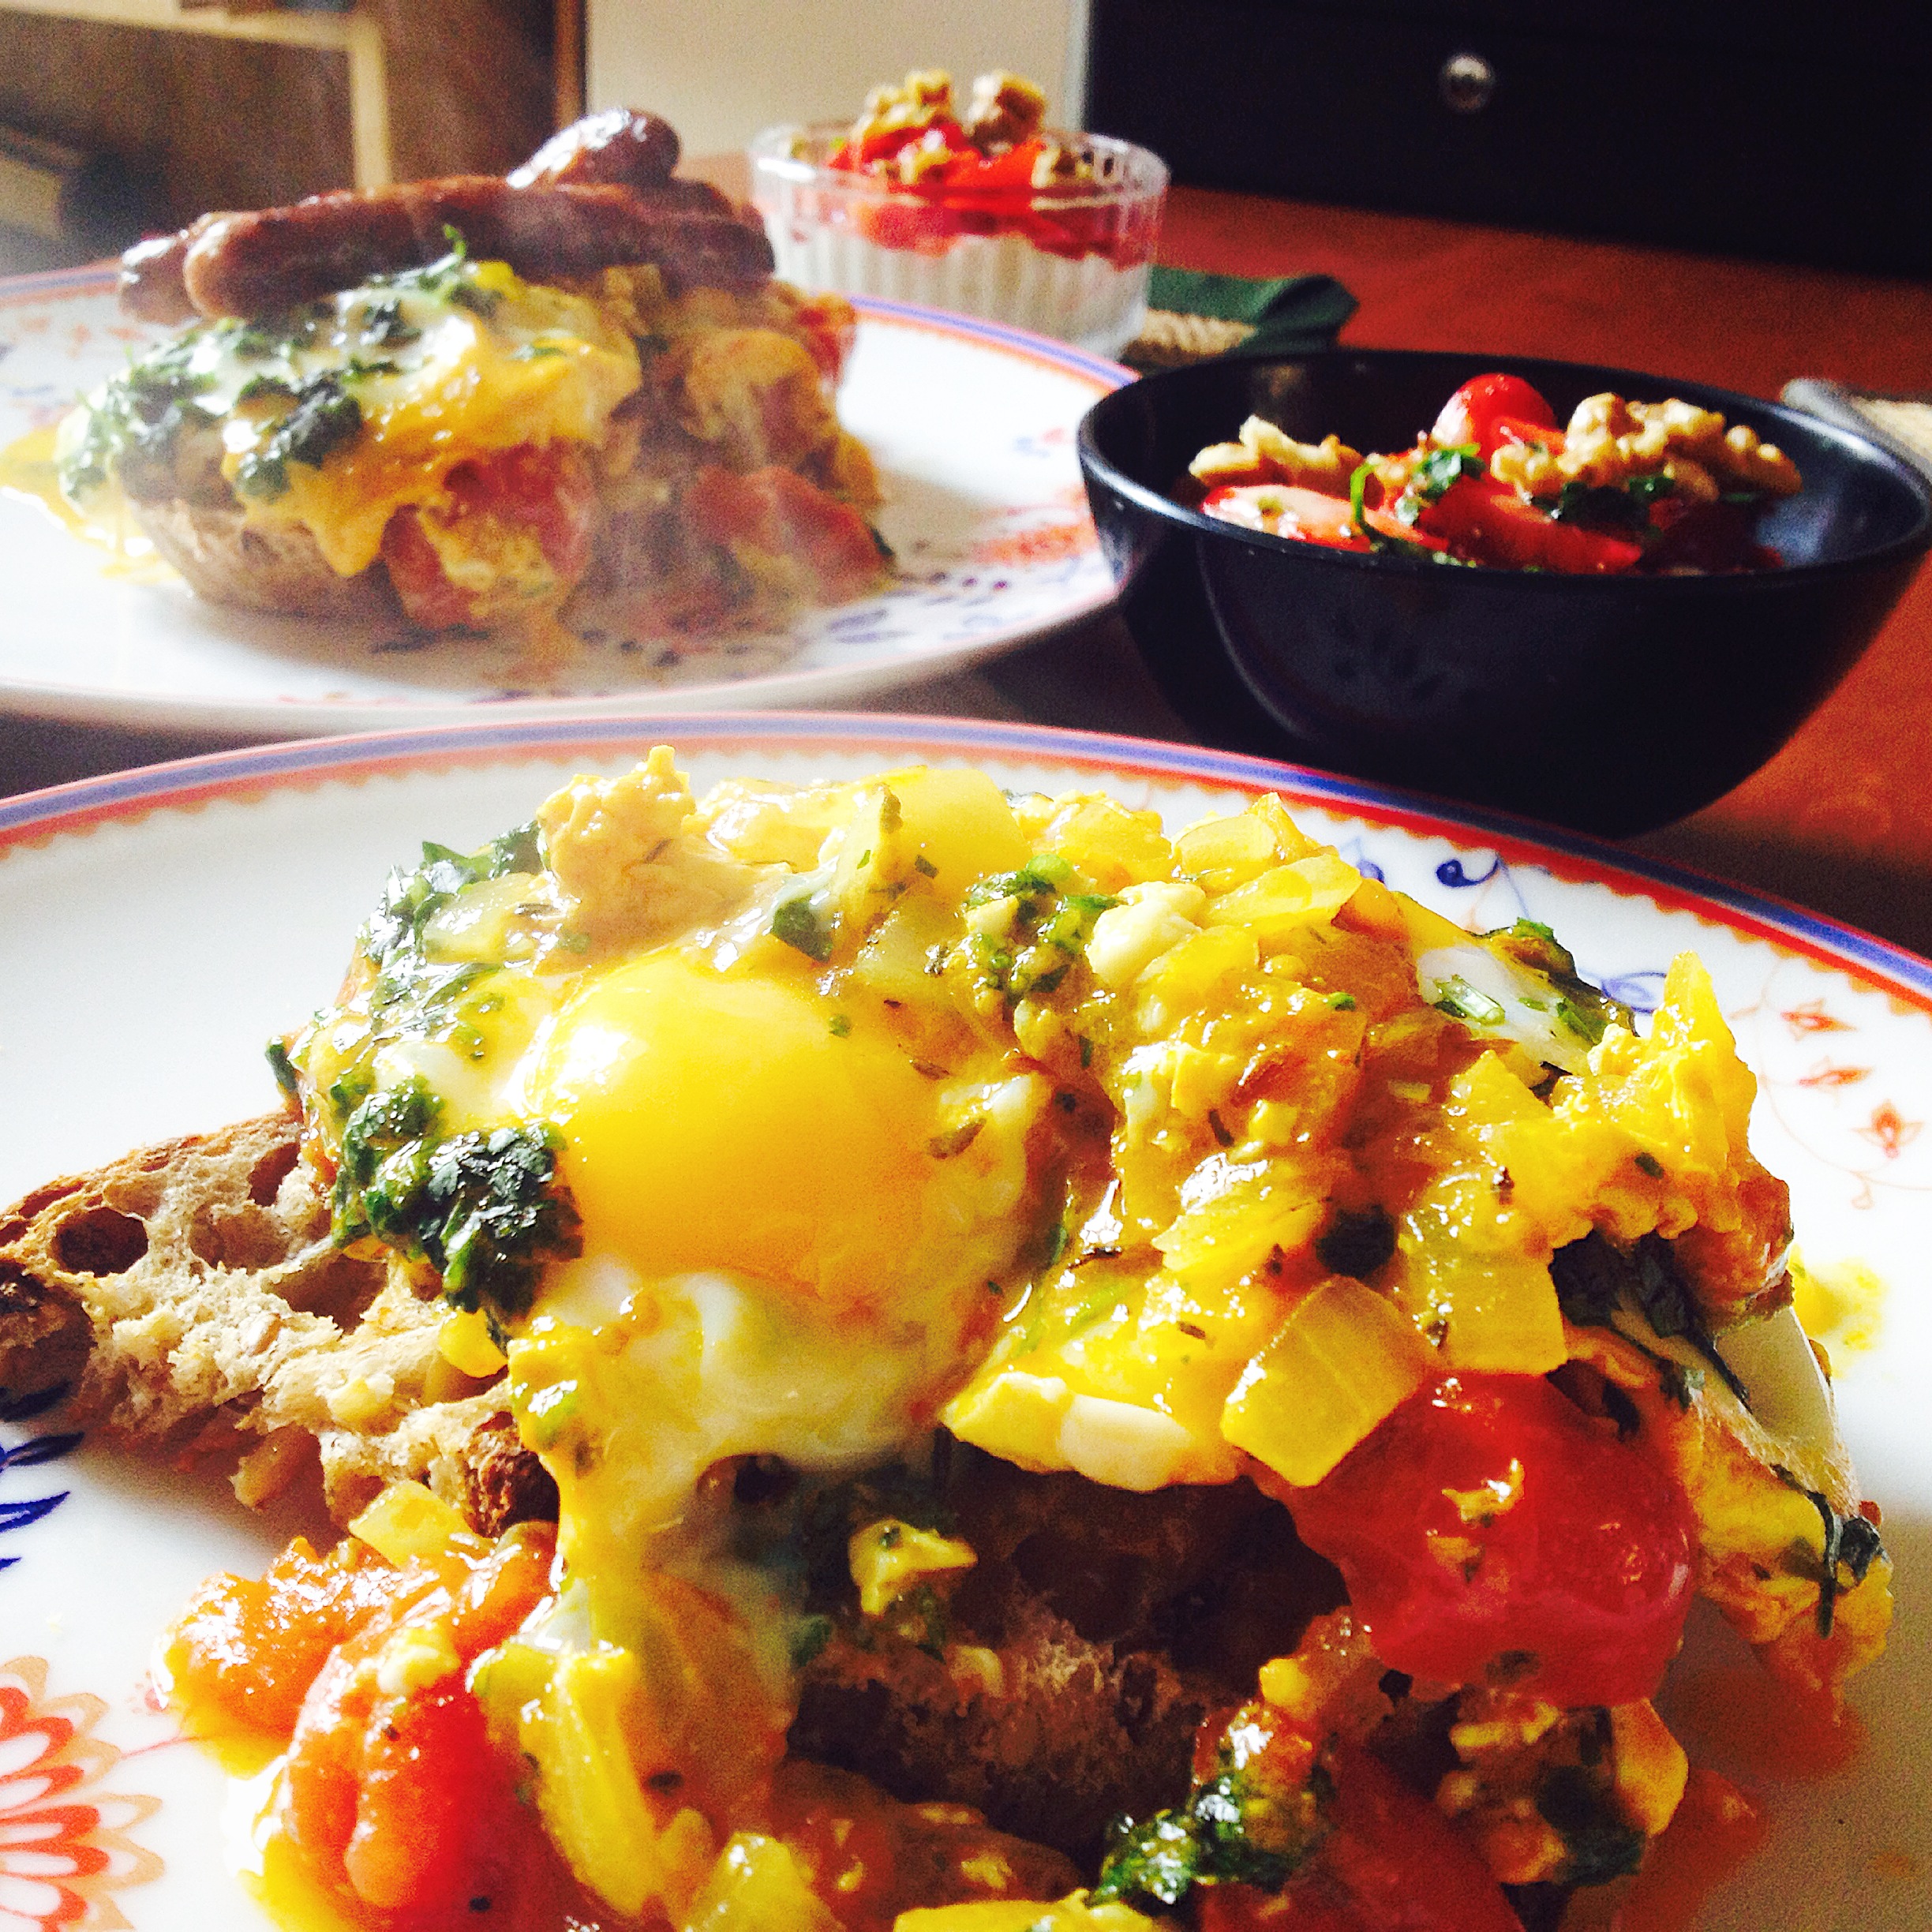
Whether you call them huevos rancheros, shakshuka, menemen or,the very familiar to me, strapatsada, eggs in aromatic red tomato sauce are a popular breakfast and meal across the world. The basic principle is to precook a red sauce, most usually with fresh tomatoes, and then to either poach or scramble the eggs in it.
I have grown up with the Greek strapatsada as a summer dish or an easy dinner, in fact it is one of the first meals I ever cooked. Whilst strapatsada uses subtle flavours such as green peppers, pepper, basil or parsley and scrambles the eggs with feta cheese, shakshuka gains its distinctive flavour from spices such as (at least) cumin and turmeric, and requires that you poach the eggs towards the end of the cooking process.
You can play with this dish endlessly. Add chilli and serve with avocado for a Mexican twist, or use sumac for the scrambled Turkish menemen version. But today I am sharing a version of the dish, closest to shakshuka, which has allowed my Lia’s Kitchen recipe to reach new heights of flavour through the addition of honey mustard and fennel seeds. At the end of this blog entry, in my regular tips section, I give you instructions for a strapatsada in the hope that this will satisfy your Greek cuisine cravings.
Ingredients
Feeds 4 (two eggs each)
- 4 eggs
- 1 medium onion finely chopped
- 300g cherry tomatoes halved or 1 tin of chopped tomatoes
- 2 fresh bay leaves or one dry
- 1/2 t turmeric
- 1 t cumin seers
- 1/4 t fennel seeds
- 1/2 t dried thyme
- 1 bay leaf
- 1 T (honey) mustard
- 1 t sugar
- 1T finely chopped coriander
- Salt and pepper
- Olive oil
Preparation
30 minutes chopping and cooking
- Pick a pan wide enough to fit your four eggs when you poach them on top of the sauce.
- Sauté the onion in a couple of tablespoons of oil with a couple of tablespoons of salt and all the spices until translucent.
- Add the mustard and stir fry for a couple more minutes to release all the aromas. Add the tomatoes, another pinch of salt, the sugar.
- Stir, cover and cook on low heat for 10-15 minutes or until the juices are almost dry (more time needed for a tin of tomatoes). Break the four eggs carefully on top of the sauce.
- Lower the heat, cover and cook for 5 minutes or until the top of the eggs steam cooks to a light white.
- Sprinkle with the chopped coriander.
- Remove the eggs from heat immediately after you cook to stop the eggs from going firm or serve immediately.
Lia’s Tips:
- It’s not the end of the world if the eggs go firm but this dish is most wonderful with runny poached eggs.
- The more eggs you poach the wider your cooking pot should be.
- Serve on sourdough bread. You will not forget me once you have tried this!
- For a stapatsada include half or one green pepper and fry with the onions; don’t use any of the herbs or spices above, just salt and black pepper, and use parsley or basil to flavour the sauce (basil is traditionally used in some of the Greek islands); once the sauce is cooked scramble the eggs in, remove from heat when the are cooked and add crumbled feta cheese (about 100g) to finish
Mushroom and tarragon tagliatelle
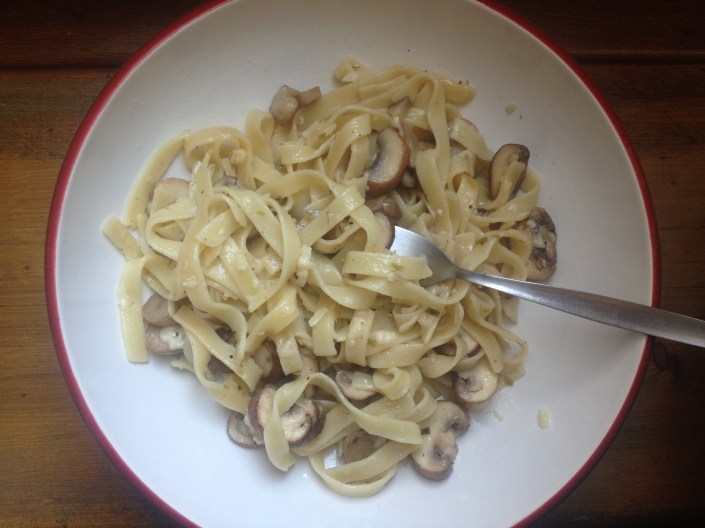
The first time I tasted The Italian Wine Women’s Lini 910 Labrusca Bianco, its citrus notes immediately evoked the flavours of tarragon, garlic and mushroom as a dish match. The next day I put together this simple, quick but extremely tasty recipe that has become one of Lia’s Kitchen favourite pasta dishes this year.
Wild mushrooms make this dish even more special. With oyster mushroom season starting in September, this luxury ingredient can be a surprisingly affordable addition to your autumn menu.
Ingredients
Feeds 4 to 6 people
- 500g chestnut, oyster or wild mushrooms, thickly sliced
- 500g tagliatelle
- 4 garlic cloves, finely chopped
- 3-4 tablespoon dried tarragon
- 100g grated Parmigiano Reggiano, or Bookhams Twineham Grange (vegetarian)
- 4 tablespoons olive oil
- 2 tablespoon salted butter
- Salt and freshly ground pepper
Preparation
- Chop the mushrooms thickly. Peel and chop the garlic. Set aside.
- Heat the olive oil and fry the mushrooms for a few minutes adding 2-3 generous pinches of salt.
- Add half the tarragon at the same time and stir well so the heat releases its flavours.
- Add the garlic a few minutes into your cooking (to avoid burning it) and stir well, on medium heat.
- When the mushrooms look close to being cooked (5-10minutes) add the rest of the tarragon.
- Boil the tagliatelle, adding a pinch of salt and a drop of olive oil, until you have pasta al dente.
- Drain the pasta and add to the mushroom mixture whilst the pan is still on the hob. Stir well.
- Remove from hob, add the grated parmesan and a generous amount of freshly grated pepper.
- Pour yourself a glass of Lini Bianco and take a sip after the first bite of your pasta. Divine!
Carrot and chickpea tagine with lemon couscous
Carrot and chickpea tagine with lemon couscous
A dish served at Somersault festival from an outdoor Lia’s Kitchen.
Moroccan is one of those cuisines that combine sweetness, tanginess and aromas beautifully, transforming even the most basic of ingredients into deliciously opulent dishes.
This carrot and chickpea tagine is an ideal dish for outdoor cooking for the masses and can be executed easily in the most basic of outdoor kitchens, as we found out at Somersault festival at the end of July. The non-dairy ingredients not only make it light and healthy but also more suitable for camping and outdoor kitchens without refrigeration.
What makes this dish, apart from the toasting of its aromatic spice mix, is the combination of ginger and onion which are sautéed at the first step of the dish. This pairing is not unique to Moroccan cuisine and I first came across it in Cambodia and then Kerala, where it seems to be the base for so many of the dry dishes that accompany family meals every day.
The accompanying lemon couscous is easy and quick to make. Its tanginess pairs well with the sweet spiciness of the tagine. In shortage of preserved lemons last month I used lemon and lime peel and much of their juice to flavour the couscous.
Ingredients
(Feeds 4-5)
For Tagine
1 onion
4 garlic cloves
1 T grated fresh ginger
¾ t ground cinnamon
½ t ground black pepper
½ t cayenne pepper
¼ t ground cumin
¼ t Ras-el-Hanout or couscous spice mixture
A pinch of smoked paprika
Handful of fresh coriander chopped
5 carrots thickly chopped –whole- (400g)
5 cups precooked chickpeas, drained and washed
2 T honey
Olive oil for frying
Salt for seasoning
1 T lemon or lime juice (optional)
For Cous Cous
4 T turmeric
Peel of half a lemon
2 T lemon juice and up to half a lemon
3 garlic cloves (mashed or finely chopped)
1.5 cup couscous
¼ cup or a handful of chopped coriander
Salt and pepper to season
Instruction
(One hour preparation and cooking time)
Fry the finely chopped onion and grated ginger (and a pinch of salt) in a little olive oil for a couple minutes.
Add the spices and fry for a bit more until translucent.
Add the garlic and fry for a minute or two at low heat -make sure it does not burn.
Add the carrots and stir fry until well coated with the spices.
Add the drained chickpeas and the lemon juice and a few pinches of salt.
Add a bit of warm water (just enough for the ingredients not to stick to the pan).
At the same time add the honey and some more olive oil.
Stir well, cover and simmer on low heat until the carrots are soft but still have a bite (usually twenty minutes).
At the end of the process add the fresh and finely chopped coriander and mix.
Whilst the tagine is cooking boil one and a half cup of water.
Add some olive oil to a hot frying pan and fry the lemon peel and the turmeric.
Add the garlic and some salt and lightly fry but avoid burning.
Add the boiling water, season, mix and then stir in the couscous.
Take off the heat and cover until the couscous rises and doubles in size.
Add the fresh coriander when the couscous is ready.
Try and season to taste.
Lia’s Tips:
For the tagine use a wide and deep frying pan, preferably twenty centimetres. This allows the liquid to evaporate more evenly and quicker speeding up your cooking time. It also means you don’t need as much liquid to cook the carrots.
At the end of the cooking time there will be no sauce for this tagine but the dish should not be really dry. The honey and the added liquid should have formed a thin syrup that keeps the dish moist. If you run out of liquid as the carrots boil make sure you add enough to achieve this.
The dish is vegan but of course there is nothing stopping you from adding a couple of dollops of Greek-style yoghurt or some feta.
You can replace the fresh coriander with a tablespoon of dry coriander in the couscous if you would like.


Serradura with strawberries in port
One of the easiest but tastiest desserts you will ever make. This Portuguese-origin dessert is ingenious and literally means sawdust, named after the finely ground rich tea biscuits used to make its layers. The combination with strawberries in port is a match made in heaven and I discovered it just in time for the strawberry season.
Ingredients
Feeds 4
250g thick cream
7-8 rich tea biscuit ground to fine dust
7 T condensed milk
1 t vanilla essence
220g sliced strawberries
50g caster sugar
1/2 t allspice or pimento berries ground
1 star anice pod
1/2 t vanilla extract
Small handful finely chopped basil , preferably Thai basil.
Enough port to cover the strawberries , about 50Ml
Preparation
Grind biscuits to fine dust in a blender.
Whip cream to soft peaks.
Add vanilla extract and condensed milk, mix and whip again to soft peaks.
Layer four small glasses or containers with biscuit dust, a layer of whipped cream, biscuit and cream. Make layers thin.
Place in the fridge.
Slice and chop the strawberries in half.
Finely chop and basil and add to the strawberries in a bowls or container that has a lid.
Add the sugar, spices and vanilla essence and mix.
Add enough port to the strawberries to just about cover them, mix and set aside.
Cover with lid and place in the fridge for at least an hour.
Lia’s tips:
About four hours is an ideal time to set the strawberries aside. The strawberries get soggier the longer you leave them.
A child’s non alcoholic version is delicious with maple syrup.
The first time around the cream whips really quickly so take care not to make it too stiff.


Lemon Thyme Olive Tapenade
This recipe is for the Pequito-Cruz family
This tapenade is inspired by Summer and it featured on the menu of our first popup lunch on 22 June. Themed after the Mediterranean and Iberian cuisines we paired this zesty but sweet tapenade with a Classic Italian bruschetta for a special appetiser. Easy and fuss free it’s the perfect dip or spread. A perfect surprise for barbecues and the summer season.
Ingredients
160g drained and pitted black olives
1 garlic clove
2 T lemon juice
1 handful fresh flat leaf parsley
Leaves of two twigs of fresh lemon thyme
1 T honey
Salt and pepper for seasoning
Preparation
Add all ingredients in a blender and blend to a chunky consistency.
Lia’s tips
Don’t cream the tapenade as it’s much better if it’s chunkier. I used the Vitamix of the venue I cooked at, at the highest setting. The tapenade was still delicious but I prefer it chunkier.
Add a tablespoon of oil if you wish so that the tapenade binds better.

Moorish Mint Sauce
This is a recipe for Suzanna and Andre. Thank you for the Easter visit, and the wonderful start to Spring.
This sauce will not let you down. You can use it as a salad dressing. It can add sharpness and a crescendo to dips or rice dishes when sprinkled over them as a finishing touch. And for the carnivores it is the perfect companion to roast lamb.
The freshness of mint reminds of summer. It is a herb so loved and an essential ingredient in Greek , North African , Arabic but also Caribbean cuisines which are amongst my favourite.
Not only does mint pair beautifully with cinnamon, lemon and lime, in drinks , foods and condiments but it’s medicinal properties are renowned. Mint is an antiseptic, it calms stomach upset, it decongests and helps us breath easy, but it also stimulates the mind.
Mint has many varieties, plain mint, peppermint and spearmint are the best known. As the summer sneaks in why not try to add mint to more of your drinks and food, it will lift you up and accentuate all flavours like no other herb , trust me.
Ingredients
1 large handful of fresh mint
1/2 cup olive oil
3 T white wine vinegar
1 garlic clove roughly chopped
1/2 t salt
Preparation
Add all the ingredients in a blender
Pulse until the mint is finely chopped and turned into a creamy sauce.
Add toasted almonds for an extra special flavour .

Gnocchi di sweet patata!
A recipe for my beloved brother who seems to be becoming quite the chef!
Sweet potato is a bulb versatile and easy to cook. It can be the base for sweet and savoury dishes, such as the American sweet potato pie with condensed milk or plain deep fries.
It is a great alternative to the plain and lovely potato because of its complex carbohydrates, which make it more suitable for low carb diets. It is high in vitamin C content and also contains vitamin A, B5, B6 and beta-carotene. In other words it is a winner in terms of health benefits but also taste.
I use it a lot in to make different types mash, salads, breakfast hash and for so many other recipes. Recently I made the best gnocchi in my cooking experience with sweet potato. And I wanted to share it with you. Try it and you might never go back to the original.
Ingredients
Feeds 6-8
1 kg sweet potatoes peeled
450gr all-purpose or whole wheat flour
1 egg
Flour for rolling and dusting gnocchi
Salt to flavour and for boiling water
Optional- a bit of ground nutmeg
Preparation
Making 40min-cooking 3min
Peel and cut the sweet potatoes in large pieces.
Boil the sweet potatoes in salted water for 10 minutes or until they are soft.
Rinse with cold water, leave to drain to get rid of excess water and steam.
Mash with fork or masher.
Make a well in the mash, add 2/3 of the flour, salt and the egg and mix well with a spoon.
If you are adding ground nutmeg add it now.
If the dough looks sticky add the rest of the flour and even more if needed to make the dough firm but soft.
Knead for a few minutes to make a non-sticky dough.
Flour a surface and make four 2cm wide dough tubes.
Cut with a sharp but smooth knife in 3cm long dumplings.
Place on a floured surface to dry a bit.
Bring a large pot of water to boiling point, add gnocchi and cook for maximum 3 minutes.
The gnocchi will float to the surface when it’s ready and at that time you must remove immediately.
Serve with browned butter and melted Roquefort cheese and/or vegetarian ragú carrot sauce.
Lia’s Notes:
- When picking sweet potatoes makes sure they are not bruised.
- I used orange skin and flesh sweet potatoes for this recipe because of the colour they give gnocchi but I think all sweet potatoes would work.
- If your gnocchi dough is sticky before you start the boiling gnocchi they will not hold their shape. Add flour to the dough if it is sticky.
- Do not over boil the gnocchi
- I have not managed to make a good gnocchi without egg but apparently a lot of practice might make it possible.
- For an egg free, vegan version of the gnocchi start with using 300g of flour and only add 75g more if it needs the flour. Try cooking a couple of gnocchi to see if this has worked before adding an egg or scratching your head about what you are going to do with this bloody dough- I have been there!
- You can freeze gnocchi according to many people. I would advise you freeze them flat and once they are frozen move to bags of 1 or 2 portions. I have not tried this so let me know how it goes!