Recipes
Caramelised Onion, Leek and Spinach Pie
A favourite pie with a sweat and creamy twist. Makes 12 pieces.
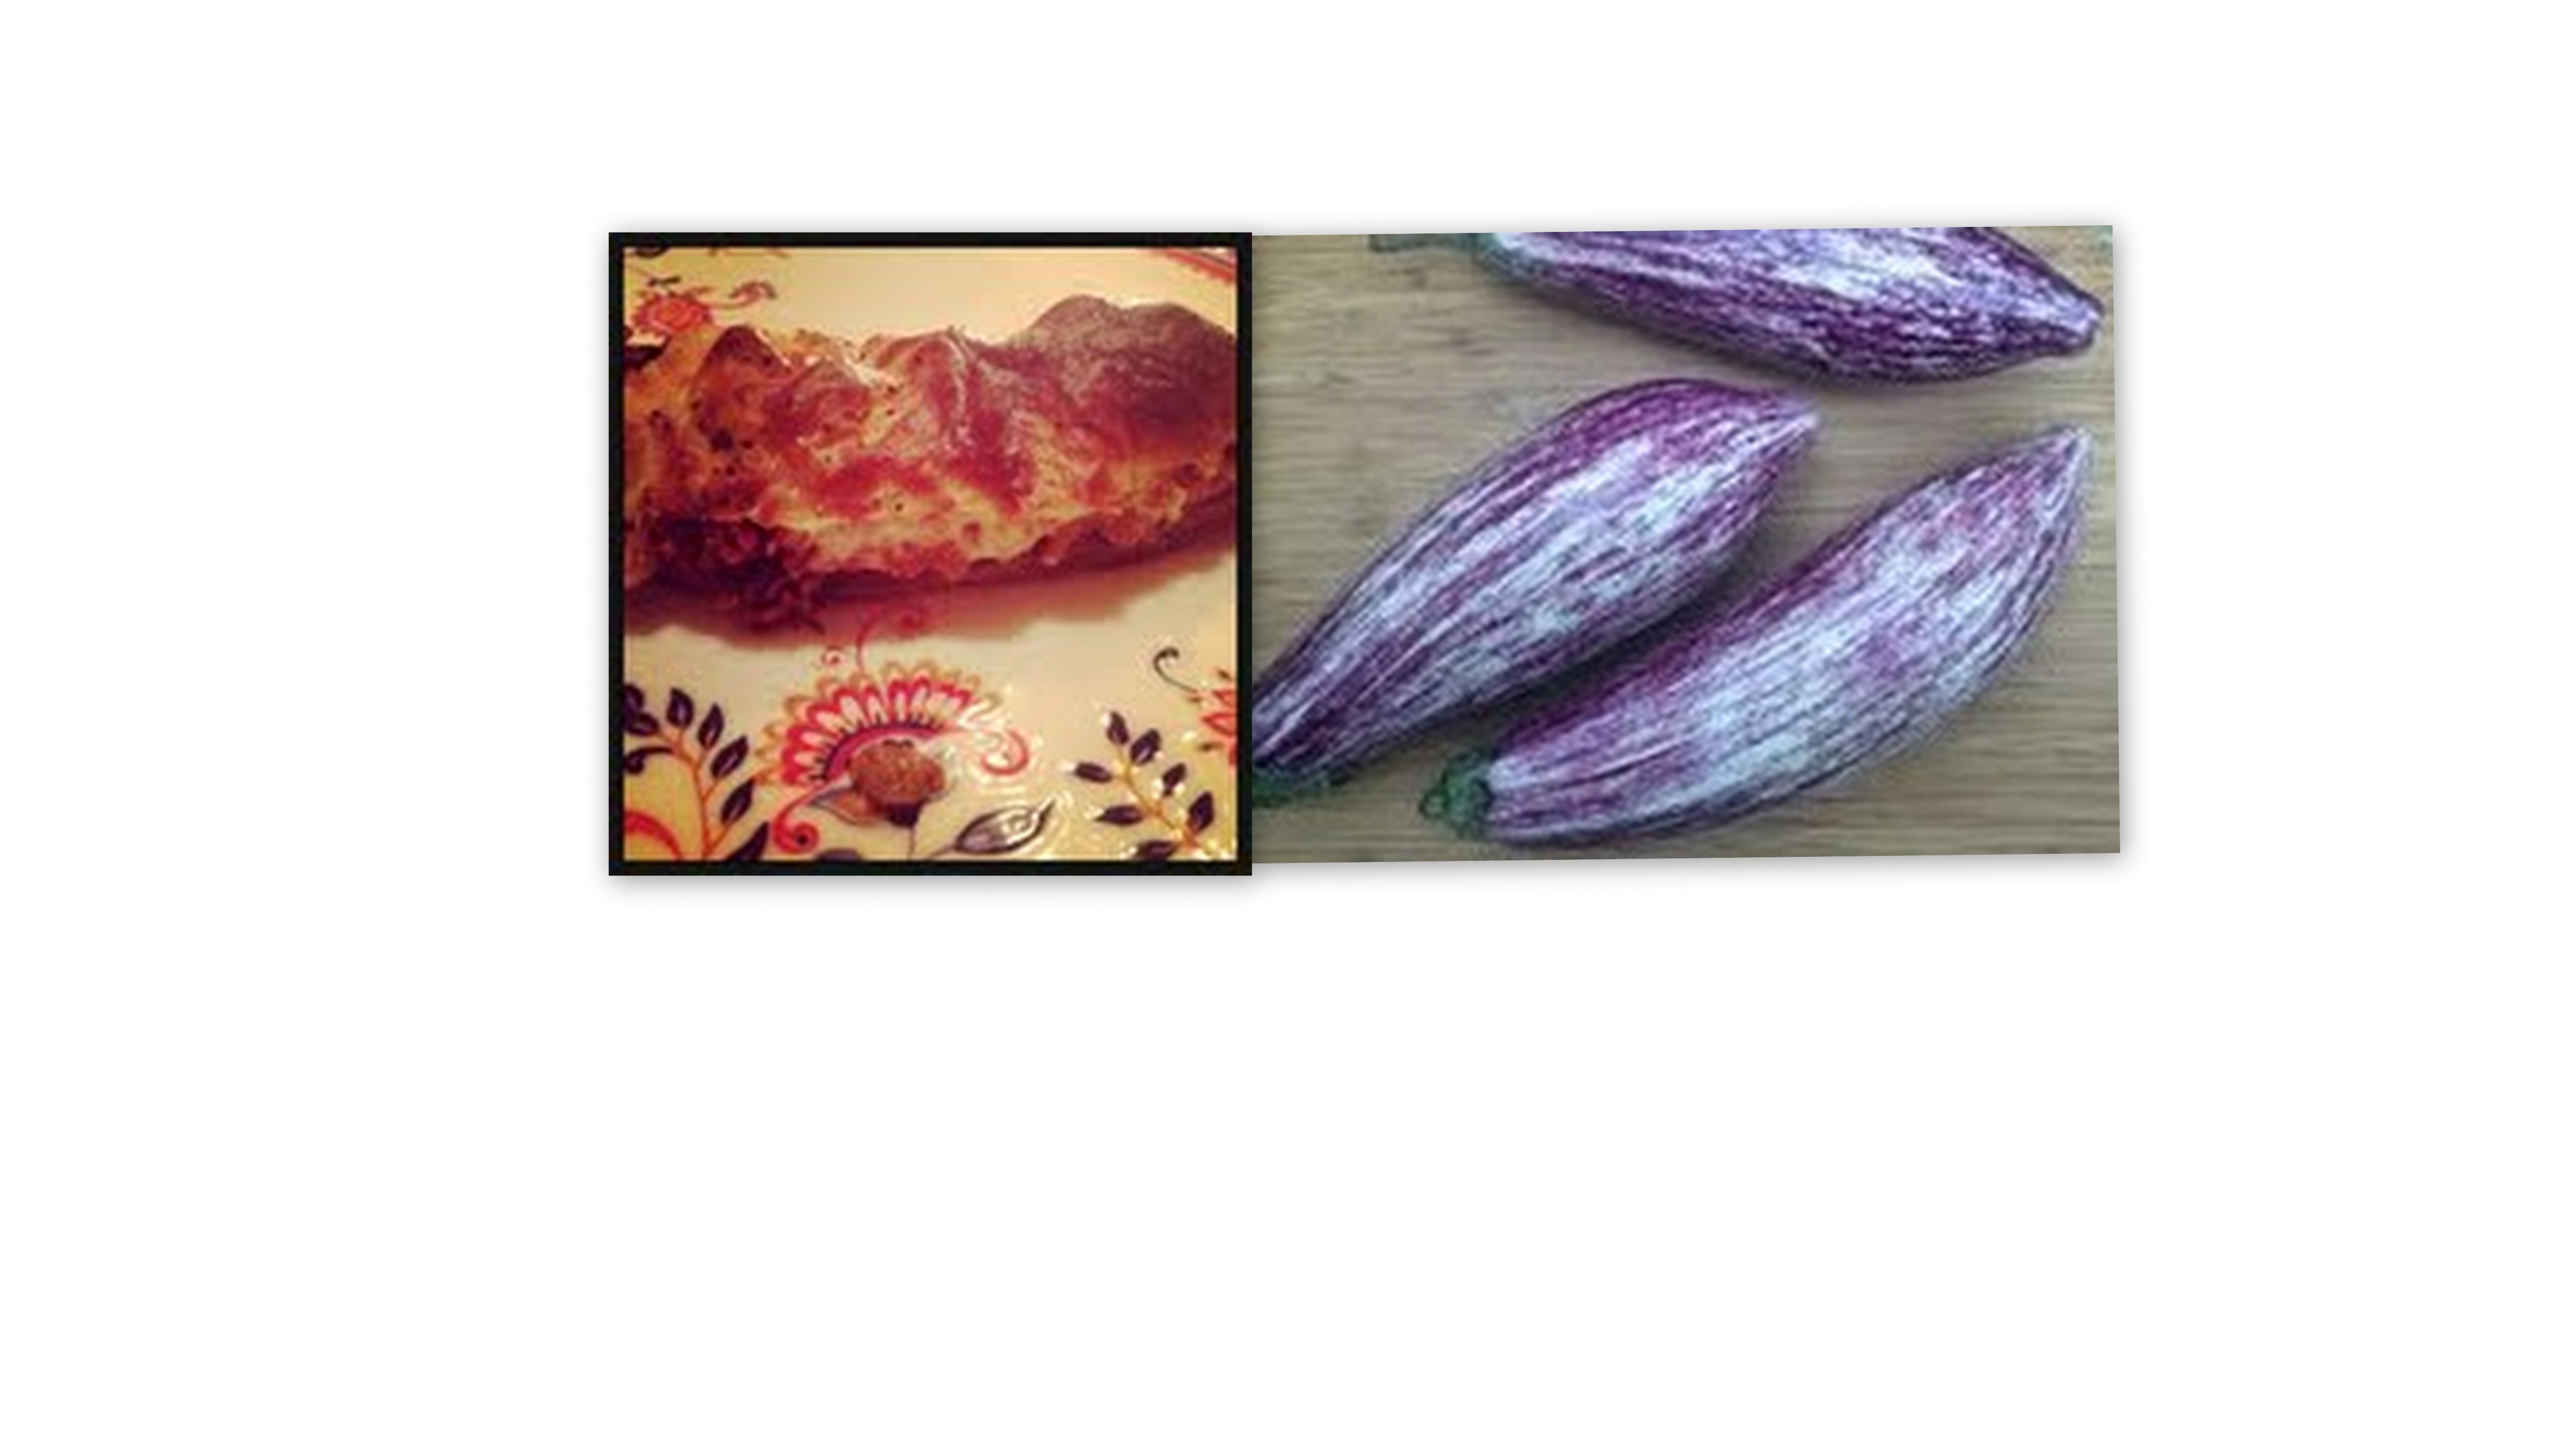
Little Shoes of Aubergine
This is one of these dishes that I loved as a kid as much as I love it now. A true family favourite at many Greek homes around the world. Little Shoes (Papoutsakia) are a Sunday special, a holiday treat and a more indulgent version of the know Imam Bayildi.
Below is a recipe that might convince you that Little Shoes are as easy to make as lasagne, or a pasta bake, if not easier. Little shoes can easily be transformed to a vegetarian version as suggested below. If you are vegan you can remove the béchamel and still have a very tasty special dish. If you use plain wheat free flour for the béchamel you can have a dish for your wheat intolerant friends. This dish can be easily adapted to your taste and needs.
Ingredients
The little shoes
1kg medium sized Aubergines (preferably Tsakoniki akaΤσακώνικη)[1]
The Filling
500gr Quorn mince (or 700gr minced beef for a non-vegetarian version) [2]
3 small onions, finely chopped
2-3 garlic cloves, finely chopped or crushed
1 cup of dry white wine
2-3 tomatoes or 1 tin of chopped tomatoes
1 bunch of parsley , finely chopped
The Béchamel
4 cups of milk
1 cup flour
50gr butter
1-2 eggs
Tspn ground nutmeg
1 cup of cheese (graviera or pecorino are preferable)
salt and pepper
Preparation
The Filling
Sauté the onion in a little olive oil with a pinch of salt until nearly translucent.
Add the Quorn or meat mince, season with salt and pepper and stir fry. [3]
For the Quorn mince add a little more oil so that it does not stick to the pan.
For the beef mince keep stirring so that the mince remains separated and evenly browned.
Add the wine and stir for a couple of minutes.
Add the chopped tomatoes, the garlic and the parsley, stir, cover and cook.
The filling is ready when the mince has absorbed all the liquid but is not dry.
This should take approximately half an hour for quorn and a bit longer for the meat version.
The Aubergines
Wash the aubergines, cut the stalk end off and slice in half lengthwise.
Bring a deep pot of water to the boil, add the aubergines and boil until they are slightly soft (5-10min).
Drain and cool down.
Lay in a baking tray skin down and with a sharp knife cut a cross shape in the fruit’s flesh
Pull open to create enough space for filling.
The Béchamel
Prepare the sauce whilst the sauce is still cooking and use a cooking whip for stirring [4]
Add the milk to the pan and stir in the flour making sure it is well mixed with no lumps [5].
Place on medium heat and bring to the boil stirring more as the temperature rises.
When the sauce starts simmering lower the heat, add the butter and stir continuously.
Add nutmeg, salt and better and a whipped egg.
Continue stirring on low heat until the sauce thickens.
When removed from heat keep stirring, add the grated cheese and mix well.
The baked dish
Add the filling to the aubergines evenly.
Spread the béchamel on top of the filling.
Bake in a preheated medium temperature oven until the béchamel is golden (about half an hour).
Rest and cool down for 15 minutes before serving.
Notes:
[1] 1kg of aubergines should be 5 medium pieces of the tsakoniki, flask variety. You can cook this disk with the normal aubergine but the tsakoniki variety is much nicer with this dish and cooks faster.
[1] 1kg of aubergines should be 5 medium pieces of the tsakoniki, flask variety. You can cook this disk with the normal aubergine but the tsakoniki variety is much nicer with this dish and cooks faster.
[2] 500grof quorn make more filling than 500gr of minced beef so you might be able to fill an extra pepper.
[3] You can add the Quorn mince frozen to the pan. This should take a few more minutes than when your mince is defrosted. Overall cooking with quorn should be faster than with meat at this but also the sauce cooking stages.
[4] I prefer a flexible wire whip when making béchamel and it helps avoid lumps.
[5] I used plain wheat free flour this time which was very easy to mix in the milk and made a very creamy sauce.
Is-really-a-stew! (Ishtu Keralan stew/soup)
I was in Kerala in October 2012 and it was a delight in more ways than I could ever begin to describe.
One of the reasons is of course that Keralan cuisine is at the top end of the eating experiences that India could offer you. Kerala is in some ways gourmet India, a land blessed with tropical fruits, vegetable and spices and the starting points of many trails of wealth and cultural influence. If you are a culture vulture, a foodie, and a seeker of genuine community spirit, serenity and natural diversity you should make some time to visit Keralan land.
The stew dish I am introducing today is not one I tried when in Kerala- when by the way I was delighted to wake up to savoury rice puddings with egg curry for breakfast.
I learned how to cook Istoo on my return to Wales and whilst reading Vijayan Kannampilly’s, Keralan Cookbook. It is very easy to make, it is light and nutritious, and below is my fish version of it, which I hope you enjoy.
Istoo ingredients for six
700gr white fish (skinless and bones) [1]
3-4 medium potatoes , cubed (3cm cubes)
100-150g finely chopped ginger
1-2 coarsely chopped medium onions
1 finely chopped chili pepper
1 stalk of fresh curry leaves or a handful of dried curry leaves
2-3 tbsp coconut oil or vegetable oil
250-200g spinach
2-3 tins of coconut milk
Salt and pepper (about 1 tsp each)
Preparation
Place the potatoes, ginger, onions, chili in a deep pot and add enough boiling water to cover the ingredients.
Season and simmer until the potatoes are just soft.
Add the fish cubed in big chunks, and if the fish is not covered add some more boiling water.
Simmer for another 5 minutes or until the fish is cooked.
Stir in the coconut milk, add the coconut leaves and heat to a low simmer [2].
Option: add the washed spinach leaves to the stew as you do this.
Once the stew has reached its simmer turn the heat off.
Heat the coconut separately or other oil and pour it in.
Taste and season more if necessary before serving .
Notes
[1] You can find out about what fish you should consume to minimise your impact on our sees at the Marine Conservation Society’s website: http://www.goodfishguide.co.uk/. Look for alternatives to monkfish for this stew.
[2] You can add two of the coconut milk tins and some water for a thicker stew that is not as strong in coconut flavor. Or for a more soup-like version of the stew add some three tins of coconut milk and some more water.

Pancake heaven
Shrove Tuesday is now gone but I’d like to think that pancakes can return to Lia’s kitchen before the next one in 2014.
Pancakes don’t always have to be overindulgent naughty treats. Not that there’s anything wrong with that.
I hope this post becomes a quick and easy pancake recipe reference and an inspiration for an alternative savoury filling.
This recipe was given to me by Dan Green who, hat’s off to him, makes the best pancakes I have ever had-he flips them and all that! I just followed his instructions to make the batter, made a filling with what we had in the fridge and watched him put the pancakes together skilfully for us.
Aubergine and fenugreek pancake filling ingredients
1 small aubergine, cubed in 2cm pieces
Half an onion finely chopped
Half a tin of chopped tomatoes
Pinch of cinnamon powder
3-4 handful fresh fenugreek leaves roughly chopped
100gr or more grated cheddar
Filling preparation
Stir fry the aubergine, onion and a pinch of salt for five minutes.
Add the chopped tomatoes and cinnamon, stir and cook for five to ten minutes on low heat until soft and cooked.
Season with some salt and pepper (2-3 pinches of salt suggested).
When nearly ready add the fresh fenugreek.
Add the cheese when filling the pancake in the pan and whilst the second side is cooking.
You can optionally add some fresh baby spinach leaves when filling the pancake.
This is enough filling for four small pancakes.
Pancake Batter ingredients
125gr Spelt or whole meal flour
300 ml milk
1 egg
A pinch of salt
Knob of butter from frying
Pancake preparation
Add all ingredients (not the butter) and whisk to mix well.
Let the batter sit in the fridge for 20 minutes or until you prepare your fillings.
Heat a non stick frying pan on high heat.
Melt enough butter to coat the pan’s surface.
Add about a ladle full of batter in your pan.
Lift and swirl until the batter evenly covers all the surface and almost ‘licks’ its sides upwards. [1]
Lower the heat and cook for a minute or until ready-that’s when it’s easy to flip.
Flip and whilst the pancake is cooking fill with preferred filling and cheese , or fruit and chocolate.
Fold in four in the pan.
This amount of batter should give you six small pancakes and plenty for two people.
Enjoy whilst hot!
[1] This should help you flip the pancake easier.

Oh sweet grain of Halva
My mother was here until last Monday, and I kid you not, she made the best halva of her mother career for us. It was one small little change in the simple foolproof recipe that she has been using all her life- she used lime instead of lemon and oh my was that a wonderful deviation.
The halva recipe follows the simple 1-2-3-4 rule, which is fool proof and depending on your unit of measure allows you to make more or less portions of halva. If you use a cup as a unit of measurement you should have enough desert for about six people.
Remember to allow some time for the halva to cool down slightly so that you can mould it into your chosen shape or individual portions.
This desert is easy, quick, cheap and everybody loves it. And the recipe is vegetarian, vegan and dairy free.
Here is how we do Halva in the Moutselou clan although admittedly I prefer to brown the halva a bit more than mom because of the toasted grain smell it releases in the house.
Ingredients
1 measure of olive oil
2 measures of coarse semolina
3 measures of sugar (you can easily reduce that to 2 or even replace with honey)
Peel of half or whole lime or lemon
1 cinnamon stick
A big handful of chopped walnuts
Some finely chopped walnuts for dusting and decoration
Some cinnamon powder for decoration
Preparation
Prepare a syrup adding the boiled water, the sugar, a cinnamon stick and lime or lemon peel to a heat proof bowl or pan.
Stir the sugar until dissolved, cover and let it sit long enough to unleash the lime and cinnamon flavours[i].
Heat the olive oil in a pan (preferably non stick) until it’s almost sizzling.
Add the semolina to the pan and brown, stirring continuously and until it reaches your preferred shade of semolina brown[ii].
Add a big handful of coarsely chopped walnuts halfway through your browning action.
Remove the lemon/lime peel, stir the syrup in the pan of browned semolina and either remove from heat or lower to minimum whilst you continue stirring.
Remove from heat and discard the cinnamon stick.
Let the halva mixture cool down for five minutes or more.
Mould either in a bundt cake tin or a loaf tin or in individual moulds of your choice, e.g. Greek coffee cups for smaller portions.
Dust with cinnamon powder and decorate with finely ground walnuts and.
Let the halva cool down before serving. The halva is delicious cold when left in the fridge overnight.
If you wish serve with grapes and decorate with single (soya) cream
Suggestions
[i] The longer you leave your syrup to sit the more flavoursome it will be but if you are in a rush you can just let it sit whilst you go through the next few steps.
[ii] Many people like to toast the semolina very slightly and until it absorbs the oil- if you prefer this your halva can look very pale and almost beige and could be very light. I love to brown the semolina to a heavier complexion but I would recommend a light tan for most beginners.
[iii] You will see the semolina expand.
Made in Aberaeron: Vegetarian red ‘carrot’ pasta sauce
We found the main ingredient for this new red carrot pasta sauce at the roadside between Temple Bar and Criblyn villages in Ceredigion, Wales.
A compulsory stop to find our bearings and the way to the little thatched cottage that would be our home for the weekend revealed a roadside stall with bunches of fresh organic carrots, homemade jams and eggs. This was still one of those places where you are trusted to pick what you want and leave the money.
We arrived ravenous at the cottage with a bunch of fresh small organic carrots, and fettuccine pasta, tinned plum tomatoes, the basics of garlic, salt and pepper, and the luxury of cinnamon in our travel cook box.
The recipe came together in my mind when I remembered an interview of Anna del Conte, the Italian food writer who raised awareness of Italian cuisine in the UK in the late 70s, and her mention to finely chopped carrots as a main ragu ingredient.
I coarsely grated the carrots for my recipe to infuse the sauce with the bright orange colour and the organic carrot flavours of this star ingredient. The result: a pure delight and a fool-proof vegetarian ragu sauce that is guaranteed to please and comfort. Yum!
Ingredients
- 7-8 small and fresh organic carrots, coarsely grated
- 2 tins of plum tomatoes
- 1 medium onion, finely chopped
- 3 garlic cloves, finely chopped
- 1 tsp cinnamon powder
- 1 tsp sugar
- Salt and pepper
- Olive oil
- Half a pack of fettuccine or other dried pasta (120g)
Preparation
Coarsely grate the carrots after you have washed them well. No need to peel really fresh and young carrots.
Finely chop the onion.
Sweat and sauté the onion on low heat for a few minutes. Use a couple of tablespoons of olive oil.
Add the grated carrots and a couple of pinches of salt, and sauté in low heat for another ten minutes or so.
Add the two tins of plum tomatoes and a teaspoon of sugar.
Mash with a wooden spoon; add another pinch of salt or two, one or two teaspoons of cinnamon, stir and cover.
Simmer on low heat for thirty or fourtyfive minutes or until the liquid has been absorbed and the sauce has reached a thick ragu consistency.
Cover and let the sauce rest for at least fifteen or more. This helps the sauce bind and the flavours come out, patience is a key.
Serve with half a pack of fettuccine, strong crumbly cheddar and coarse pepper (we used Barbers cruncher, a West Country mature, sweet and crunchy cheddar) .
This recipe makes two very generous portions but you can share between three or four.
Smoked Haddock Salad
The Smoked Haddock Salad was created by chance to complement a colourful mid-week meal with two beautiful friends, the wonderful Chris, a loved fellow Cardiffian, whose company I have been enjoying so much lately (yey!!), and the beautiful Katerina who is brightening up our week with her express visit from Greece- ex Cardiffian (but always one at heart).

This fish salad tastes even better the day after when its simple flavours have infused the haddock overnight in the fridge.
The recipe was inspired by 300gr of smoked haddock that needed to be cooked on the day, our need for a light salad, and a quick google search for haddock salad recipes, of which eventually I followed none but one of which gave me the mustard vinaigrette idea.
It takes 15-10 minutes to makes and can be enjoyed warm too!
Smoked Haddock Salad: Feeds 4-6 as side salad and 2 for lunch
Ingredients
- 300gr skinless and boneless smoked haddock
- 300gr fine green beans chopped in three
- 2 celery sticks, thickly sliced
- a small bunch of flat leaf parsley, roughly chopped
- half a red onion , finely chopped
- 2 Tbsp whole grain mustard
- 1 tsp salt
- Olive oil
- 3 Tbsp cider vinegar
Preparation
- Add the chopped fine green beans in a flat, large shallow pan with 1/3 of it filled with boiling water.
- Simmer for five minutes, remove and drain. Keep the water boiling in the same pan.
- Add the whole fillets of smoked haddock and steam/simmer for ten minutes. Add a bit more boiling water if necessary.
- Prepare the vinaigrette by mixing in a jar the mustard, salt, cider vinegar and olive oil. Use as much olive oil as you think you need but at least five Tbsp. Shake the jar vigorously until the vinaigrette has a loose but creamy consistency. Adjust seasoning to taste.
- Remove the haddock and drain.
- Add haddock to a shallow salad bowl and flake roughly with a fork.
- Add the chopped parsley, beans and onion.
- Dress with the vinaigrette and mix well.
Enjoy as a light lunch or dinner for two on salad leaves or toasted rye bread , or as a light side dish.
Love your belly and your friends. 🙂 =love yourelf
The return of the humble: the sardine
Sardine is a humble nutritious fish that has offered me many meals at home and in taverns throughout my life.
We used to buy sardines in cone shaped newspapers. Mr Giorgos, the fishmonger in Thessaloniki’s Kifisia, the neighbourhood I grew up, used to fill them generously with big handfuls.
Saturday has always been a fish day at my parents house in Greece and also the day that mom looks forward to her little glass of ouzo or raki with some sardines or gavros (small fresh anchovies) as a starter. In the depth of winter we would grill sardines or bake them in tomato sauce in the oven. On sunny mild days and in the summer we would marinate them in with herbs, lemon and sometimes freshly grated tomatoes to grill outside attracting neighbours for an ouzo meze sit-down and most of the cats in the neighbourhood.
Below is a simple sardine recipe with a Ghanaian twist, a variation of an oven recipe I have enjoyed many times.
Ingredients
- 10 meaty and large sardines
- 3-4 freshly grated tomatoes or 2 grated tomatoes and half a tin of chopped tomatoes
- A large handful of kalamata olives pited and roughly chopped
- 1 full teaspoon of Ghanaian Shito sauce (optional)
- 2 tablespoons of olive oil
- Juice of 1 lemon
- Salt and pepper
- Oregano (2-3 pinches)
Preparation:
- Mix the tomatoes, Shito sauce, olives, lemon juice, olive oil, salt and pepper and oregano in a kitchen chopper for a few seconds, until just coarse but well mixed.
- Taste and season accordingly and if needed.
- Place the sardines in a baking tray, mix well in the marinade.
- Bake in a hot and then medium oven for 20 minutes or until cooked.
- Or if the barbequing season has started somewhere in the world where you might be, grill and enjoy out side. I guarantee that the sardines will taste even better.
Shito sauce is a Ghanaian sauce that consists primarily of fish oil and/or vegetable oil, ginger, dried fish and/or crustaceans, tomatoes, garlic and spices. It should be used in small quantities if you don’t like your dishes too spicy and hot. And it can be quite oily.
Fresh fish has clear eyes (non cloudy), red gills and a natural arch or curve. Buy wisely.

Back to a classic: tomato sauce
Posted on Updated on
I can think of a few things as comforting as a tasty tomato sauce poured generously over spaghetti. So for your convenience here is the quick recipe that has received top hits from all of Lia’s Kitchen readers in 2012.
https://liaskitchen.com/basic-tomato-sauce/
And if you fancy a variation don’t forget another favourite: Lia’s Kitchen carrot and tomato red sauce.
Enjoy!
Share this:
This entry was posted in Comment, Recipes and tagged basic recipe, basic tomato sauce, food, food photography, recipes, red carrot pasta sauce, red sauce, tomato sauce.