Recipes
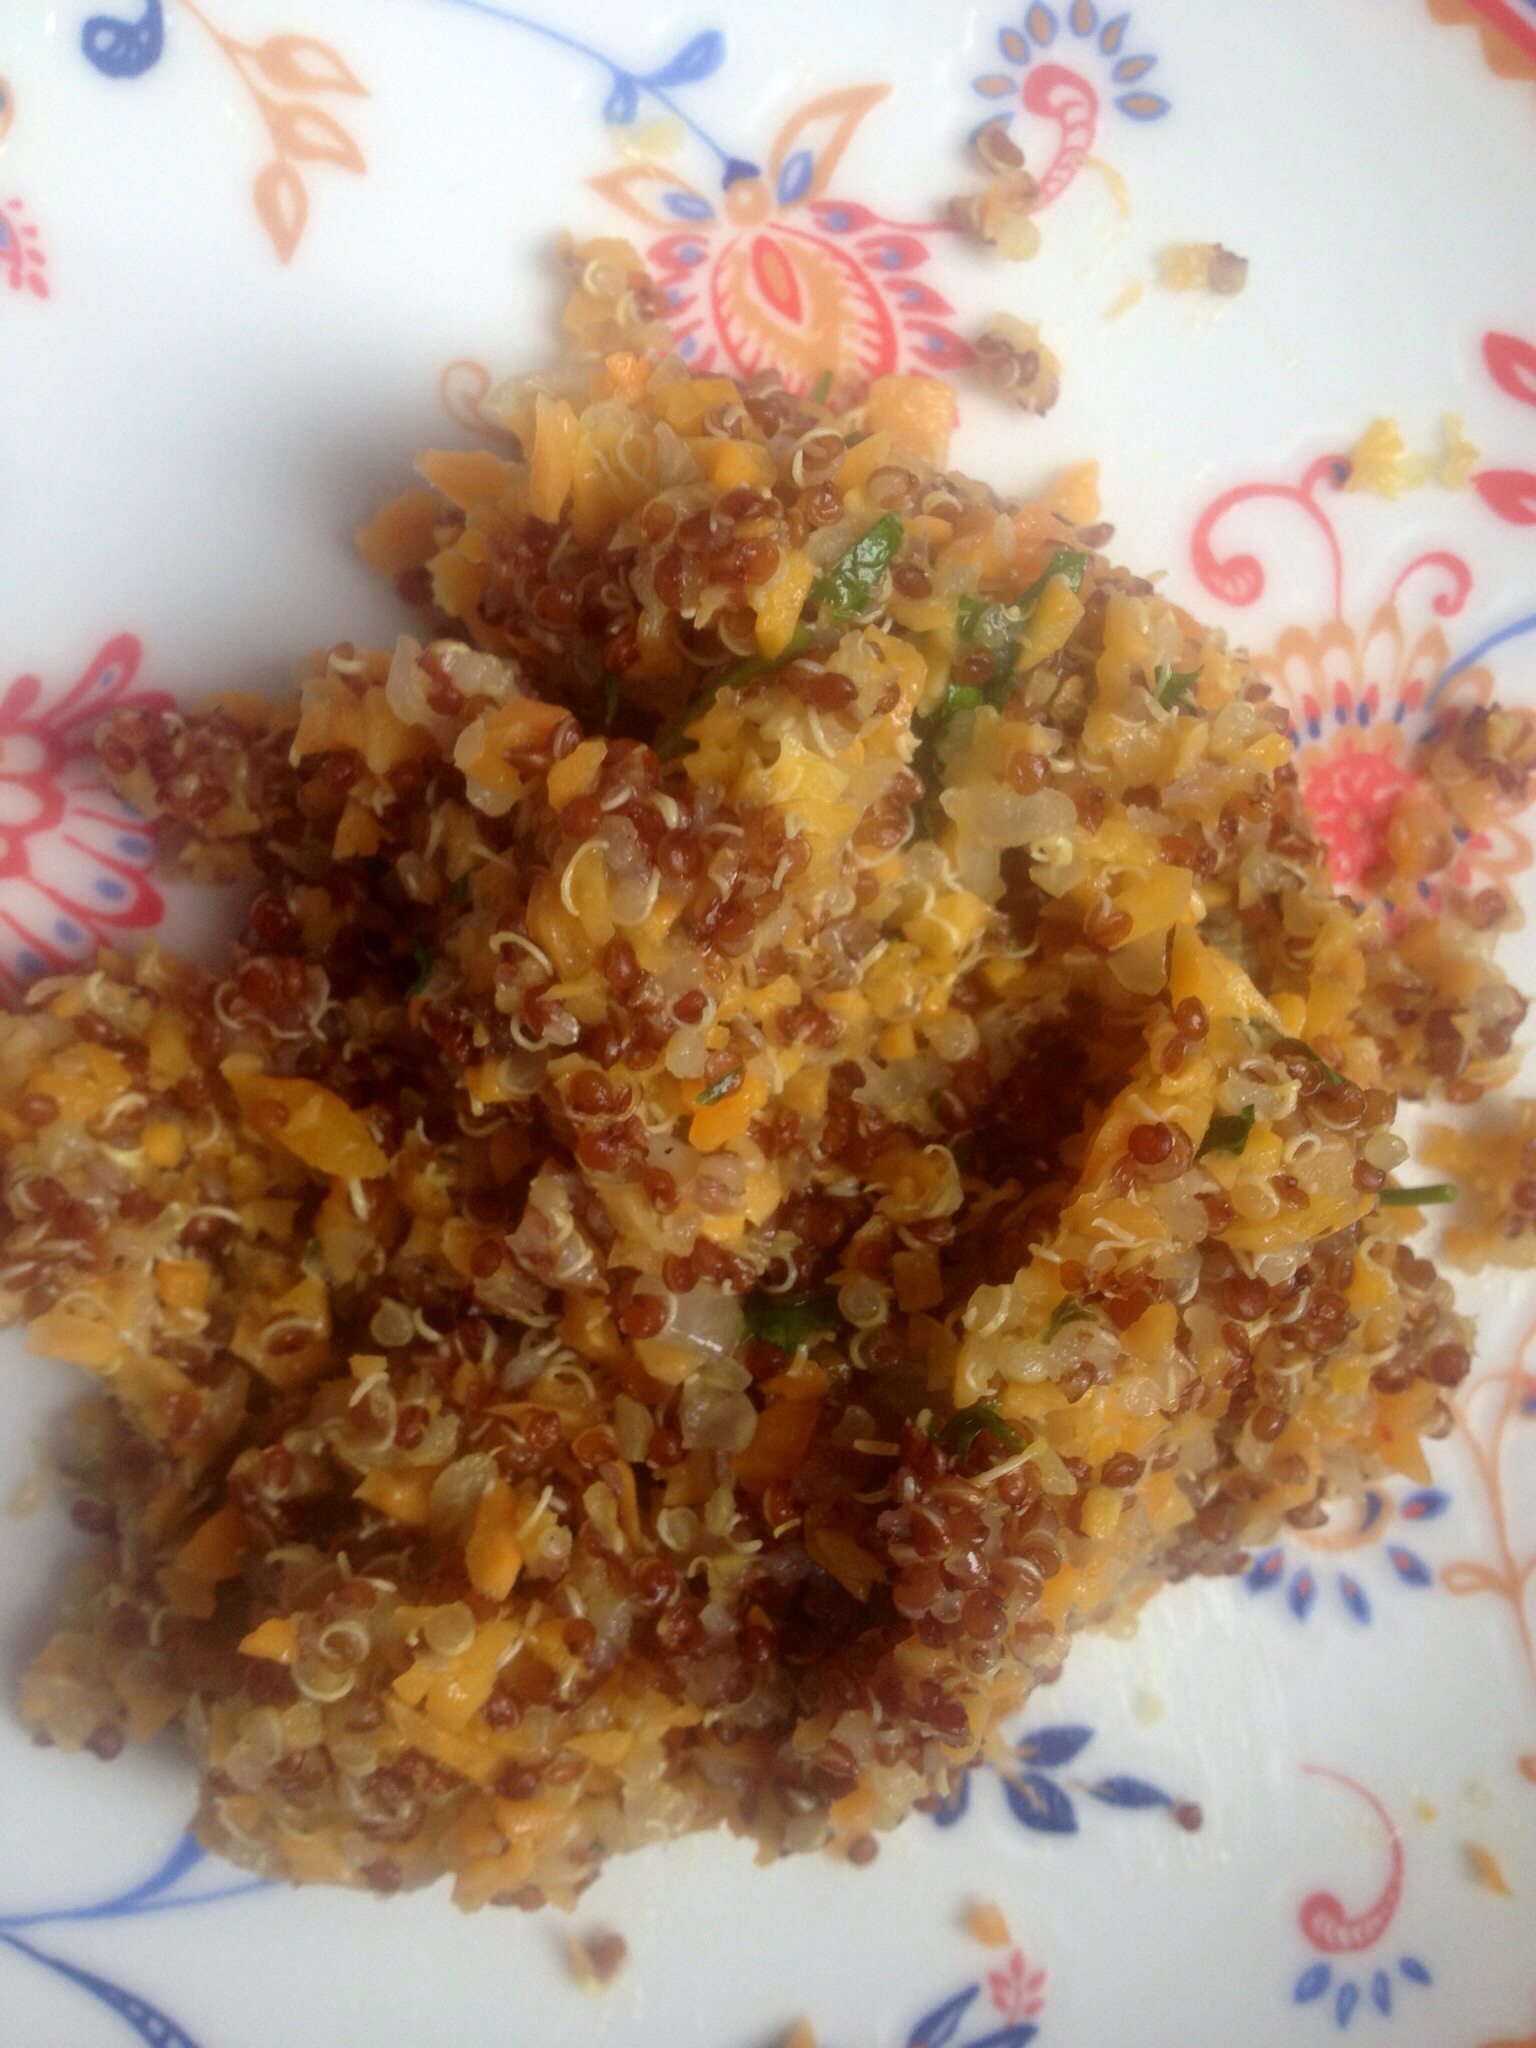
Red quinoa with sweet potato
Quinoa with sweet potato is becoming a real favourite at Lia’s Kitchen both when we are receiving guests but also when we are touring. This is an easy to make but very nutritious dish. It was on our September supperclub menu and last night this was a side dish at our dinner table when our Braunton family visited.
I am writing down this recipe for Miss Lyra May, or more accurately for her mom Beth, because she promised me that if her mommy cooks this recipe for her she will keep eating quinoa.
Now I know that this nearly four year old lady is a smart negotiator but , my dear Beth, I still think it is worth giving this a go. After all Miss Lyra’s one year old brother never objected at all to eating the quinoa.
Ingredients
Yield 6-8
1 cup red , mixed or plain quinoa
2 cups vegetable stock
1 large sweet potato coarsely grated
1 large onion finely chopped
1 (fresh) bay leaf
1/2 t mixed spices of cinnamon, cloves, pepper or a small pinch of each (optional)
1 garlic clove mashed (optional)
150 gr mince quorn (optional)
a couple of squeezes lime or lemon (optional)
1 small bunch parsley finely chopped
salt
Preparation
30 minutes
Boil two cups water and make vegetable stock.
Simmer the quinoa for up to twenty minutes, until cooked but not sticky.
Add enough olive oil to cover the base of a frying pan.
Add the onion and the bay leaf and sauté for a couple of minutes.
Add a pinch of salt.
Add the sweet potato and stir fry until soft -5 to 10 minutes.
Add the quinoa , parsley and if you need to some more olive oil.
Taste and season is necessary.
If you are using citrus juice add last.
Stir well and enjoy.
Beetroot Dip
Beetroot …. its colour is vivid, its name is like an eclectic type of music to dance to, its taste earthy but versatile and adaptable. Deeply influenced by Tom Robbins’ novel ‘Jitterbug perfume’ I have developed this strong belief that beets help build physical, emotional and mental resilience, they feed warriors and lovers, they make you stronger, protect and empower you. I am besotted with this root veg!
This September the beetroot at the two farmers’ markets in Cardiff is gigantic, earthy but deliciously sweet. So make sure you grab some from the local stalls either at Roath or Riverside-don’t miss out on its autumnal delight.
Last weekend golden beetroot was the star guest ingredient of a sweet balsamic vinaigrette salad at our art and dining supper club. A few weeks ago, in the first few weeks of September, a beetroot and carrot soup with caraway seeds warmed us up when the weather suddenly turned cold. And only yesterday I concocted a Moorish , colourful beetroot dip, which I urge you to try making without reservation. Enjoy the recipe below.
Ingredients
Enough for at least 8 starter portions
- 500g mixed or red beetroots washed well but not peeled
- 500gr Greek strained yoghurt
- 200gr feta cheese
- 30gr chives
- 2 cloves of garlic, crashed
- 2 t paprika
- 1/2 t cayenne pepper
- 1 T white wine vinegar
- enough olive oil to make dip smooth (about 1/2 cup)
- salt and pepper
Preparation
1hour
- Roast the beetroot in a hot oven until soft for around forty minutes.
- Whilst the beetroot are roasting prepare a paprika and chive yoghurt dip.
- Cream the feta cheese with one-third of the olive oil and the vinegar in a food processor (pulse) or in a deep bowl with a spoon.
- Add the chopped chives , the crashed garlic , the paprika and cayenne pepper . If added to a food processor pulse again.
- Smoothen the cheese base by adding all the Greek yoghurt. Add another third of the olive oil and stir well.
- Remove from the food processor.
- Try a bit of the yoghurt base and adjust seasoning according to taste.
- After the beetroot is roasted and soft enough allow it to cool enough to peel the skin.
- Cream the beetroot in a food processor or chop and mash in a bowl with a fork.
- Add the yoghurt dip and as much oil as needs to make it blend well (you might not need any more).
- Taste and adjust the seasoning of required.
- Serve with carrots, celery or breads.

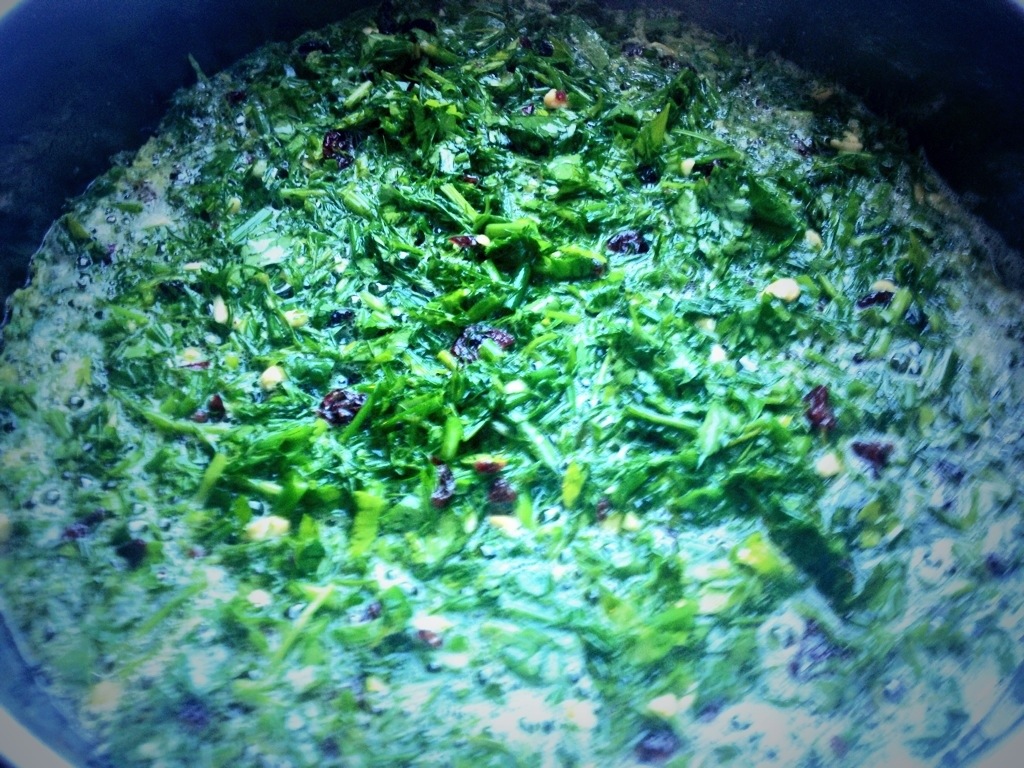
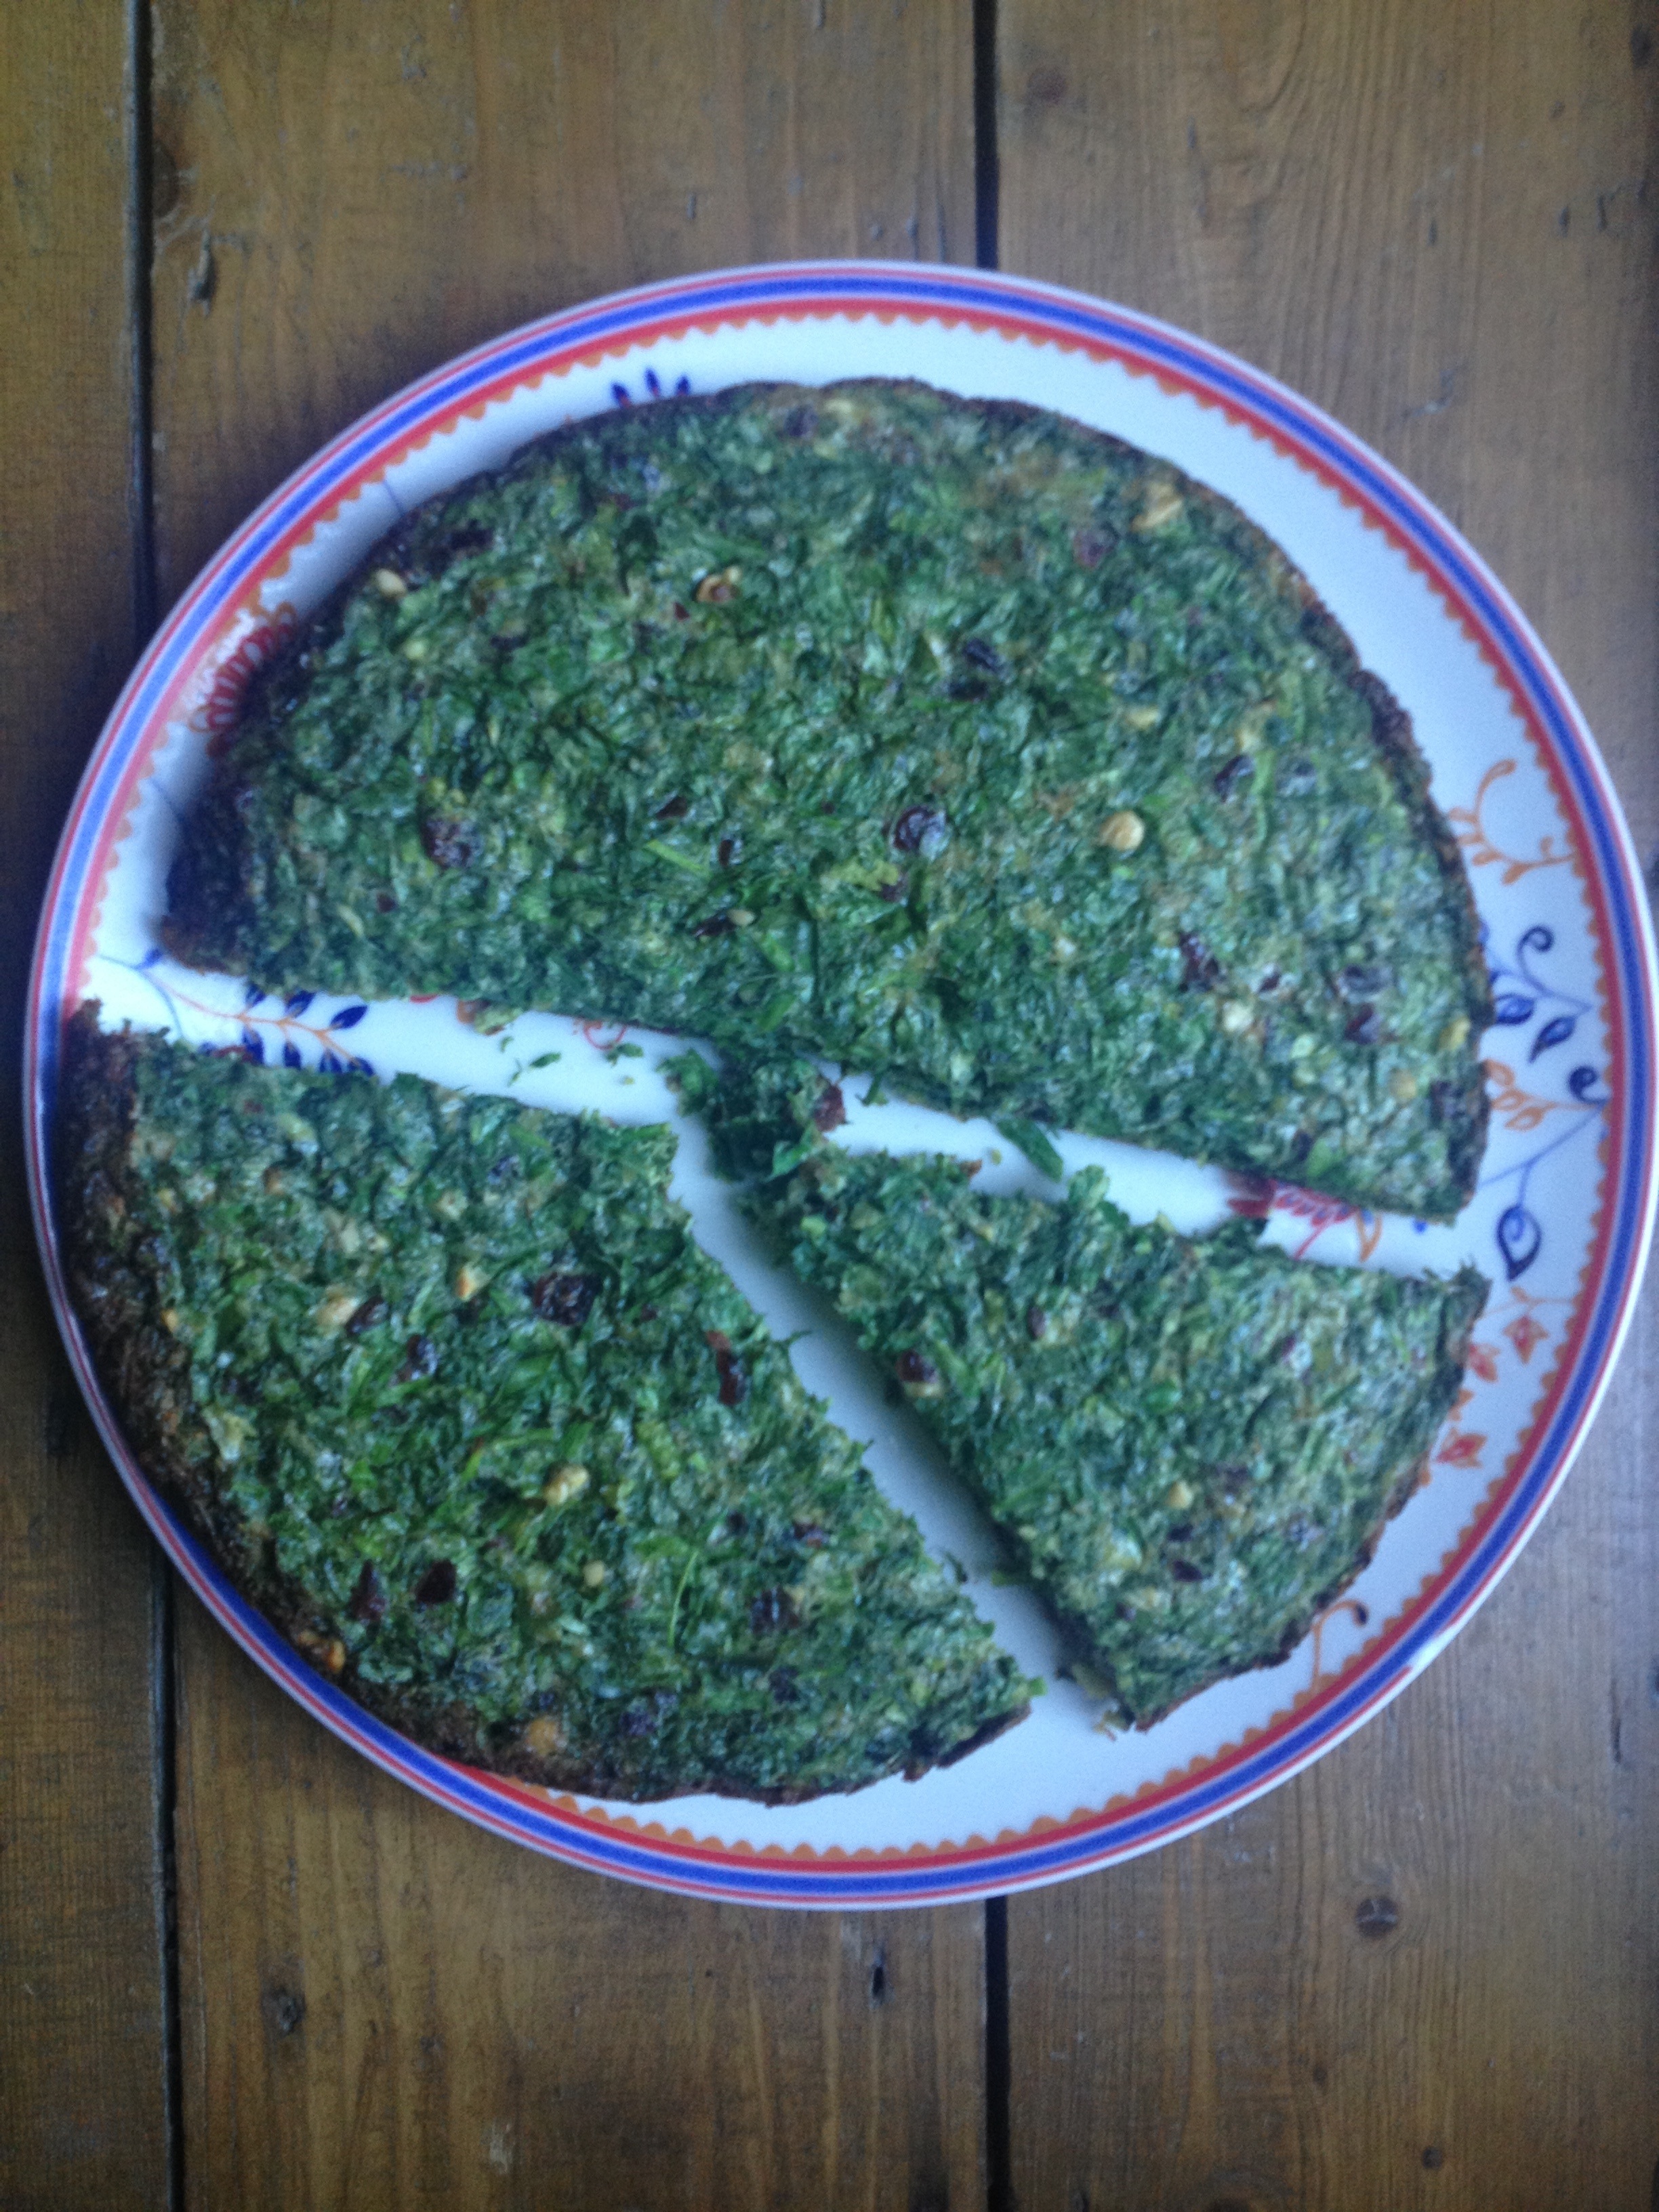
Kuku the Persian frittata
Yesterday my hungry belly and mind dug up a craving for a Persian frittata we recently tried in Bristol. I was reading about the Persians reaching the coastline of Pelion in ancient times in a book by Kostas Akrivos about Alfons Hochhouser, the Austrian pioneer of Eco tourism in Pelion. Funny how even historic facts turn to recipes in my world.
Kuku is an easy and delicious recipe. You need a large quantity of mixed herbs and eggs but the rest is very easy. It took me about 20 minutes to make. The result is a fragrant, beautiful and tasty dish!
Ingredients
Feeds four
3 cups finely chopped dill, parsley, coriander, chives or fresh onions
6 eggs
1 tsp turmeric
100g dried cranberries and cashews chopped
1 crushed garlic clove
1 tsp salt
1/2 tsp pepper
Knob of butter
Preparation
20 minutes
Preheat the oven for 10 minutes.
Chop equal amounts of all herbs and mix in ball
Beat the eggs.
Add the salt, pepper, garlic and mix.
Add the herbs , cashews and cranberries and mix.
Pick a frying pan that can be placed in the oven and melt the butter.
Pour the mixture in and lower temperature.
Fry for a couple of minutes until the sides start firming up.
Then place in the oven for 5 minutes in high temperature until it firms up.
Remove cool down and eat.
The frittata freezes well.

Almond meal muffins for Dummies (like me)!
This recipe is for my colleague Ceri and the lovely Beth Woollam of Pure Bliss Bites (who are anything but dummies!)
Fact: I love food and indulge in it but with measure. So every now and then I try out new recipes and ways of cooking that are ‘good-for-you’. Almond meal is a great alternative to flour and great for baking. And almond meal muffins can be good for you because they have no sugar, no flour and no butter- a welcome break from sugar-heavy snacks.
I copied and slightly adapted this almond meal muffin recipe from a website called DAMY (she giggles) when searching for almond meal recipes on the tinterweb and it is fantastic! DAMY seems to be a weight loss programme. So in sharing the link to this page I would like to be clear that I am neither advertising the programme nor am I advocating dieting as an approach to life. I just like the muffin recipe.
I do understand the benefits and the necessity of diets for important weight loss or in response to health risks. But I think we should all adopt good eating habits as permanently as we can and if we can (I don’t forget intolerances!). I believe that improving our nutrition and a balanced diet can be good for everyone and our environment.
Almond Meal Muffin Ingredients
Makes 12 muffins/cupcakes
2 cups of almond meal
2 eggs
2 egg whites
¼ cup agave syrup or honey or maple syrup
½ tsp baking soda
¼ tsp baking powder
1 Tbsp apple cider vinegar
1 tsp vanilla extract
pinch of salt
2 Tbsp olive oil
1 cup blueberries
1/2 – 1 cup raspberries
Preparation
Takes 40 minutes in total
Mix all ingredients apart from the berries in blender or in a ball with a hand blender.
Fold in the berries.
Fill 12 muffin cups.
Bake for 25 minutes in a medium oven, 175 centigrade.
Lia’s Notes
- I used agave syrup but I think honey and maple syrup could change the flavour of the muffins.
- My mixture was quite runny and this is why I decided to add more berries. It worked.
- I used olive oil because I always have some in the kitchen. The original recipe calls for coconut oil which as I found out you should not melt unless the recipe specifies so. I think sunflower oil would be fine too.


")
What to do with ten kilos of onions
Have you ever ordered something in a half-asleep kind of way?
A few weeks ago when ordering pie ingredients from Cardiff Market I ended up with about 10kg of onions in excess even after cooking many caramelised onion pies. In the process of making the order I was wearing my astute-business-woman face, hiding tiredness from a long day at work. And the only thing I heard the helpful man say was ‘very little money for a lot of onions’ to which of course I said ‘yes’. It is unlike me to be imprecise with orders (on food or anything really) but this wonderful mistake gave me the opportunity to experiment cooking with a lot of onions within a short period of time.
Admittedly Dan and I will not have onion soup again for a while. But we gratefully savoured its thyme and wine flavours during a May week when the weather had turned bad, we got ill and the heating came on again. French onion soup recipes online are plenty but my version is closest to Elise Bauer’s one on Simply Recipes because I also use no butter. And on occasion I choose to leave out the garlic and also make Gruyere cheese toast on granary bread instead of baguette croutons.
The bulk of my excess onions however I turned into a spiced onion chutney. I almost followed a recipe from Allotment Growing Recipes but did not use as much sugar and added ground pimento berries, bay leaves, port and red wine. The result is a fragrant onion chutney that compliments strong and piquant cheeses competently and also works well with beef burgers. I converted and amended the recipe below for you.
Ingredients
Make up to 9 medium jars and about 4Kg of Chutney.
5kg onions (peeled and chopped)
800gr dark brown sugar
9 Tbsp olive oil
3 lemons, juiced
3-4 garlic cloves, minced
3 tsp ground cinnamon
3 tsp ground nutmeg
3 tsp ground ginger
6 tsp ground coriander
3 tsp ground cloves
6 tsp salt
3 tsp black pepper and pimento berries ground together
9 Tbsp balsamic vinegar
6 Tbsp malt vinegar
1 shot of red wine
1-2 shots of port
Preparation and jarring
At least 4 hours
Heat the oil in a 5lt pot, add onions and sauté for at least 10 minutes stirring occasionally.
Add the vinegars, lemon juice and spices and cook for 2 minutes.
Add sugar and then simmer uncovered for at least 3 hours.
Half way through cooking add the wine and port.
The chutney is ready when the liquid is reduced even if not fully evaporated- it will thicken when you stir.
About half an hour before the chutney is done sterilise jars.
Boil clean jars and their lids in bubbling water for 10 minutes.
Whilst doing that preheat the oven at 110 centigrade.
Line a baking tray with a clean towel.
Place the jars upside down on the tray using metal tongs.
Leave in the over for 15 minutes.
Ladle the chutney into hot, sterilised jars and seal immediately.
Label the jars when fully cool.
The chutney should keep for a year.
Lia’s Notes:
- Be prepared to peel and chop 5 Kg of onions for about hour if you have as small a kitchen as mine.
- I added the vinegars and lemons half an hour in the cooking process is as I was adding and sautéing onions gradually.
- Leave the lid off!
- Keep on low heat and stir regularly. Caramelised is good and burnt is bad.
- I put 800gr sugar but next time I’ll use less.
- Keep the jars in the oven if you have to wait a bit longer for the chutney to cook. The jars need to be hot if you are filling with hot chutney.
- Good instructions for sterilising can be found on Taste.com, an Australian website.
- The simple rule of jarring is to never add hot chutney to a cold jar and vice versa.


Lemons and how to preserve them
Today I am writing about an experiment. I have no clue whether it will work or not in its virginal attempt but I thought I’d tell you anyway because … I am excited. I have had a go at preserving lemons, which I can then use to accentuate the flavours of tagine dishes. And apparently I could even exepriment with cakes and deserts that use preserved lemons.
Lemons, their colour, their scent, their flavour, their overall character brightness, mean happiness to me. My friend Becks loves the Forsythia hedge in our garden for its yellow flowers and the tone of happiness they bring into our house. They light up the scene. Lemons and their sunshine hue have the same effect on me.
So on a gloomy day like this, when the sun might have gone on holiday to Spain, what better idea than to surround yourself with the colour yellow and cheer your self up! Have a lemonade and wear something yellow!
Ingredients for preserved lemons
Enough for a 10cm diameter jar and about 8 cm height
4 Lemons for preserving
1 Lemon for juice
1 Bay leaf
Some peppercorns
4 Heaped tbsp coarse salt
Additional coarse salt for jar layering
Preparation
20min and 1 month preservation (at least)
Wash unwaxed lemons really well.
Juice the juiciest of lemons. Then slice the leftover skin in strips.
Layer the bottom of the jar with a couple of heaped tbsp of coarse salt.
Cut the four lemons in four but avoid cutting through them. Cut along the middle of the lemon first and then across.
Pull the flesh of each lemon open and add 1 or more tbsp of heaped salt inside it.
Add lemons to the jar snuggly and top with more coarse salt.
Sprinkle with peppercorns between layers.
Add bay leaves to the sides of the jar.
Top with strips of the juiced lemon flesh and top with more salt.
Pour the lemon juice over the contents of the jar.
Push down lemons with a wooden spoon to bring lemon juices out.
Seal and wait patiently for at least a month for your lemons to preserve.
Lia’s Notes:
- You can also use limes. I added one lime to make the experiment more interesting.
- Salt takes away the lemons bitterness. Same effect it has on aubergines when you prepare them for cooking.
- You can keep preserved lemons for about a year.
- My tinterweb research reveals thta Meyer lemons are the best for preserved lemons. I just used what I had.
- I decided to use flavourings inspired by Snowflake Kitchen’s Blog and as I have bay leaves in abundance all year around.
- Zoe English makes the best preserved lemons I have tried. Fact. She has ecnouraged me to do my own. Who she is I am sure you will find out soon 🙂
- Punk Domestics, a directory of cooks and community activity and a gateway to cookery blogs, is how I learnt to preserve lemons.
- Through Punk Domestics, I filtered down my preferred preserved lemon recipes which in addition to Snowflake Kitchen’s Blog can be seen on the One tomato, two tomato, The view from the Island (with star anise) and Head Space Canning blogs.
- Enjoy preserving sunshine!
![lemons[web]](https://i0.wp.com/liaskitchen.com/wp-content/uploads/2013/04/lemonsweb.jpg?w=231&h=231&crop=1&ssl=1 "lemons[web]")


Tourlou!
Spring is here! I am writing to you from one of our local cafés. Its wide French doors are open to an outdoor terrace. It’s still light and warm and a soft breeze just brought in scents of blossom (and something delicious cooking in a kitchen).
I have chosen to share with you the recipe for Tourlou, a mixed vegetable dish that tastes like spring and summer to me. A fridge chilled portion of it with some crumbled feta (surprise, surprise!) is just as nice to eat as straight after cooking or cooled to room temperature. But I’d prefer the chilled version today because it makes me think of Vourvourou, my friend Maria and resting in the shade in her company sipping a chilled beer (sigh!).
Back to cooking! Tourlou is an easy recipe and great for using a medley of vegetable. It can be a light evening dinner on its own or served with rice, a delicious side dish or alternative to salad, and a fantastic tapa or meze. And apparently Tourlou is the same as briam only it’s cooked on a hob- here’s something new for food geeks like me.
Ingredients
Serves 2 for main and more as a meze or side
1 aubergine
2 courgette
2-3 potatoes
1 large onion, chopped
2 garlic cloves, finely chopped or crushed
1 pepper, chopped (optional)
1 carrot (optional)
200g ripe tomatoes, finely chopped or chopped in blender
OR
1 can chopped tomatoes (400g mixed weight)
Small bunch of parsley, finely chopped
1 tsp salt
½ tsp sugar
Pepper (to taste)
Olive oil
Preparation
Takes up to an hour
Wash all vegetable, peel the potatoes, and dice it all in five centimeter (large) chunks.
Sauté the onion and a pinch of salt in about two Tbsp olive oil for a couple of minutes.
Add one or two more Tbsp olive oil, the vegetable, toss and fry for about five minutes.
Add the garlic, let it fry for a minute without burning and add the tomatoes.
Add the sugar and also season with salt and pepper.
Stir well and cover.
Lower the heat and simmer for forty minutes or until the potatoes are soft.
Add the chopped parsley at the end or half way through the cooking.
Lia’s Notes:
- For a good Tourlou do not to stir during simmering to avoid breaking the vegetable as it softens.
- The tomatoes should have enough juice for all the vegetable to cook but halfway through cooking check if you need to add a couple of Tbsp of water to make sure the potatoes cook.
- Replace potatoes with other root vegetable such as parsnip if you like.
- I prefer cooking Tourlou with more aubergine and one courgette.
- Use any vegetable you like. Okra is fantastic in tourlou but might take a bit longer to cook.
- For Briam use the same ingredients, add a little bit of water and cover a baking tray with foil. Slow cook for about an hour in the oven.

Mexican biscuits
These biscuits will make you dance and yelp ‘άndele άndele!’ like Speedy Gonzales!
I tasted these in Laugharne at a restaurant called the Ranch and could not wait to get back to bake.
Ingredients
Makes around 50 pieces
70gr sugar
210gr salted butter
300gr flour
100gr walnuts, coarsely ground
Zest of one orange
1 Tbsp (spiced) rum
Preparation
Keep the butter in a warm room before creaming with the sugar.
Add the walnuts, zest and rum and knead dough with your fingers.
Shape the dough in mini ovals, 3cm wide and 4cm long.
Bake in 170 Celsius/gas mark 3 to 4. The biscuits must remain pale once baked.
Cool down. Enjoy with hot chocolate, coffee or a glass of red wine.
For a different flavour try pistachio nuts with lime.


Scrambu
An alternative to scrambled eggs. It’s nice to imagine recipes for ingredients you did not know how to cook with. Scrambu has made Tofu part of our regular diet easily.
Ingredients
Serves up to 4
350gr Tofu, plain or smoked
1 onion finely chopped
1 tsp turmeric
1 tsp paprika, plain or smoked
½ tsp salt
2 tsp mustard seeds
100gr baby plum or cherry tomatoes (handful)
100gr grated cheddar cheese
1 small bunch of fresh coriander or basil
Garam massala spices (optional if you are using coriander)
pepper
Oil
Preparation
Sauté the onion in a bit of oil until translucent. Season with a pinch of salt.
Add the mustard seeds until they start popping.
Add the tomatoes sliced in half or quarters and cook for a few minutes until softened.
Crumble the tofu with your hands into the mixture.
Add the turmeric and paprika and stir with a wooden spoon. Add as much turmeric as you need to make the tofu look like scramble eggs.
Cook the tofu with your spices for about five minutes. Season with the rest of your salt and pepper.
Turn the heat off and add the grated cheese. Toss until the cheese it melts nicely.
Taste and season more if required, tofu is very bland and might need more salt than you thought it does.
Be creative with your spices in tofu. You can make Indian, Thai or Italian flavoured scrambu as we do or make your own version. Coriander goes really well with garam massala spices and you can add a chilli pepper too. But the basil and tomato version is very tasty too with a pinch of cinnamon or pimento berries.
Enjoy on warm buttered toast.


Recipe postcards from Lia’s Kitchen
Posted on Updated on
It’s happening !
I have written my own little recipe cards and will be presenting and selling those at the Art Car Bootique at Chapter Arts Cardiff on 14 April 2013.
The cards are designed by the fantastic Mr Twang of http://twangdom.com/ , to whom I owe many thanks. You are extremely talented and intuitive with a great feel for what your client wants.
Some of the photos are by another talented artist Dan Green at dangreenphotography.com but also by moi! It’s all done in my kitchen so the food is real and all eaten soon after it’s immortalized.
If in Cardiff, Wales on 14 April drop by Chapter Arts . Meet us (me, Twang and Dan Green) and meet the recipe cards!
Share this:
This entry was posted in Comment, Greek cuisine, Recipes and tagged easy recipe gifts, Lia's kitchen cards, Recipe cards, recipe postcards.